Linguini with Blue Crabs in Red Sauce

I have fond memories of midnight crabbing on the Quantuck Bay. This late night effort always meant a Sunday feast of my father’s linguini with blue crabs in red sauce.

He has been making this dish since I was a child, and it is the one time that we Lucianos, are all quiet around the table with sauce-splattered faces from sucking out the sweet meat.

You can read my What's in Season article, Crabbing at Midnight for Edible East End's, High Summer 2014 IssueIn the meantime, here is my father's recipe, happy slurping.

Linguini with Blue Crabs in Red Sauce

Ingredients

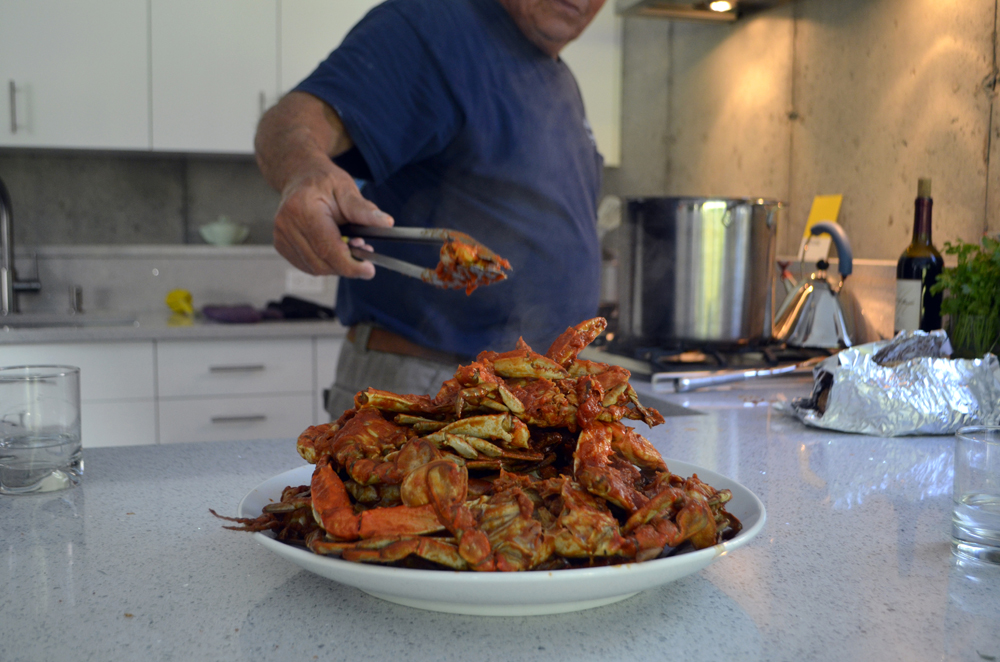
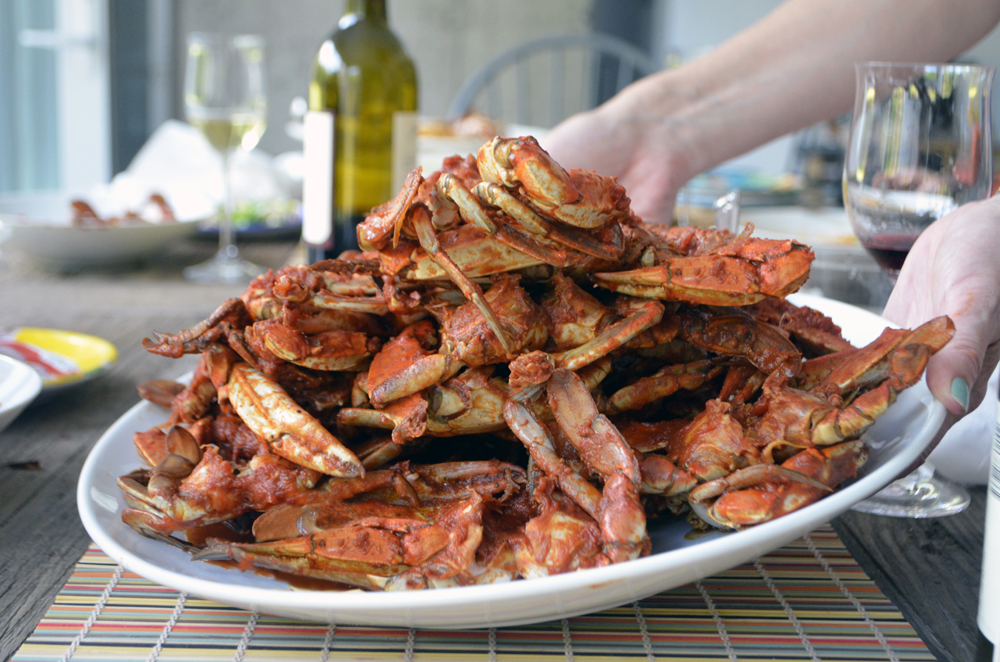
  • 2 dozen crabs, cleaned
  • 3 tablespoons of olive oil
  • 5 garlic cloves, sliced
  • 1 small can of tomato paste
  • 4 12-ounce cans of crushed tomatoes
  • ½ cup of red wine
  • 1 teaspoon of crushed red pepper flakes
  • 1 teaspoon of dried oregano
  • 2 tablespoons of freshly chopped parsley
  • ⅓ cup sea salt for pasta water
  • 1 tablespoon of salt
  • 1 tablespoon of cracked black pepper
  • 2 pounds of dried linguini

Directions: Clean the crabs: 

  1. Stun live blue crab by placing in ice water for five minutes.
  2. Grasping crab by its legs and under the top shell spine, pry off the top shell using the shell’s spine for leverage. This instantly kills the crab.
  3. Flip crab over and remove the apron and rinse under cold water, removing entrails.
  4. Using thumb, twist off the mouthparts and remove spongy gills from both halves and rinse, set aside.

In a large stockpot sauté the garlic in olive oil over low heat for 5 minutes. Slowly heating the garlic infuses the garlic flavor into the oil; do not burn. Add the tomato paste and red pepper flakes, stir for 2 minutes. Then add the red wine to loosen up the bits on the bottom of the pot. Add the crushed tomatoes, oregano and 1 tablespoon of sea salt and cracked black pepper, stir to incorporate. Add the crabs. (If the legs fall off during the cleaning process simply add them in.) Give the pot a gentle swirl. Simmer the sauce for two hours with the lid closed. Check frequently to make sure it is not boiling. If the sauce is watery, set the lid ajar while simmering. Fill a large pot with water 3 inches from the rim. Place the ⅓ cup of sea salt in the pot. Seasoning your pasta water with salt is extremely important. Once the water comes to a rolling boil, add the pasta and cook until the linguini is al dente. Take the crabs out of the sauce and place in a large bowl. Once the linguini is done, drain in a colander and place the pasta back in the pot it was cooking in. Add 4 cups of the red sauce to dress the pasta, add the parsley and toss. Place in a large serving bowl.

Tools and wear: Crab crackers, a table lined with newspapers and a bib will be necessary as you will be cracking, slurping and sucking. Serves: 8 (with possible leftovers)

    Grilled Pizza: Thinking Outside The Bun

    Summertime is all about grilling. And on the East End of Long Island, backyard grills are in full-flame. Farm-to-grill is my thing this time of year. Farmers markets are bustling with just picked heirloom vegetables and juicy fruits. The finest selections of artisanal award-winning cheeses from goats and cows are being sampled by the summering masses and same day organic eggs are being gobbled up by the dozen. Long Island variety mushrooms are showing off their spores and craft beer is being poured into growlers. I get giddy. So much so, that I have been thinking outside the bun.

    I am addicted to grilled pizza. It sounds novel but it is truly elementary. Imagine a Neapolitan thin crust style pizza that is perfectly soft and crisp, lightly-charred, with a nice smoky flavor that cooks in a flash right on your grill. The hardest part to making grilled pizza is figuring out what to put on top. Meander through the Hayground, Westhampton, Montauk and the up-and-coming Hampton Bays farmers markets and I am sure you will be inspired too. 

    I made my own pizza dough with Montauk Brewing Company’s Driftwood Ale, however, store bought pizza is easy enough, right? When the ingredients are as fresh as they are on the East End anything goes. This is about thinking outside the bun, so give homemade pizza beer dough a chance and get grilling.

    This past week, I experimented with different types of toppings: 

    Catapano Goat Cheese with Long Island potatoes, leeks and caramelized onions

    Browder’ Birds eggs, Long Island asparagus with ricotta, prosciutto, Amagansett Sea Salt East Hampton Blend

    Shinnecock clams with Sang Lee Farms garlic scapes that I made into pesto

    longislandmushroom_grilledbeerpizza

    Shiitake Mushrooms from Long Island Mushroom Company with homemade sausage, caramelized red onions, ricotta, farm eggs and homegrown oregano.

    Grilled Pizza with Browder’s Birds Eggs, Sang Lee Farms Asparagus with Ricotta, Prosciutto and Amagansett Sea Salt East Hampton Blend.

    Beer Pizza Dough

    beer pizza dough

    Ingredients

    • 1 can of room temperature Montauk Brewing Company Driftwood Ale Beer (or any favorite brew)
    • 4 cups of King Arthur flour
    • ¼ cup of olive oil
    • 2 teaspoons of sea salt
    • 2 teaspoons of honey
    • 1 packet of active dry yeast (or 3 tablespoons of your own sourdough starter)
    Montauk Brewing Company


    Directions

    1. Combine the flour, yeast, (or starter) and salt in a stand mixer with the dough hook. Turn the machine on and add the oil.

    2. Turn the stand mixer on low to medium and add the beer a little at a time. Mix until the mixture forms a ball and is slightly sticky to the touch. If it is still dry, add another tablespoon or two of the beer and process for a few seconds.

    note: if the mixture is too sticky, add flour a tablespoon at a time.

    3. Turn the dough onto a floured work surface and knead by hand for a few seconds to form a smooth, round dough ball. Put the dough in a bowl and cover with plastic wrap; let rise until the dough doubles in size, 1 to 4 hours.

    4. When the dough is ready, divide into 3 pieces. Roll each piece into a ¼-inch pizza shape of your choice.

    Note: you can freeze the pizza dough for later use.

    Grilling the Pizza

    Ingredients

    • 3 eggs
    • ½ pound of asparagus
    • 5 pieces of prosciutto (more or less as you like)
    • 1 cup of ricotta cheese, whipped 
    • 1/2 cup of grated piave or grana padano cheese.
    • Amagansett Sea Salt, East Hampton Blend
    • Olive Oil
    • Cracked Black Pepper

    Equipment

    • Grill
    • Brush for oil
    • Metal spatula
    • Metal tongs 

    Directions

    Note: Make sure you prep all your ingredients before you start grilling as the pizza cooks fast and you want to make sure you have everything on hand and ready to go. The grill should be set to high.

    1. Pre-grill the asparagus in tinfoil with a little bit of olive oil; cook until just tender. Whip the ricotta until smooth in a mini food processor.
    2. Roll out the dough to a ¼ inch thick; an oblong shape.

      note: do not worry if the shape is not perfect, it does not matter, have fun.
       
    3. Take the stretched piece of dough and place directly on the grill. Cook the first side with the lid shut for one minute. Then open lid and when dough puffs it is time to flip. Lower the temperature on the grill to low.
    4. Flip the dough, and quickly brush the olive oil and then spread the ricotta cheese. Crack the 3 eggs evenly over the pizza.
    5. Then place the asparagus and prosciutto.
    6.  As the second side grills, the cheese melts, and the eggs begin to cook. When the egg whites are set the pizza is done. Sprinkle with Amagansett Sea Salt, East Hampton Blend, cracked black pepper and a drizzle of olive oil.

    Sweet Woodland Farm: A Growing Homestead

    Nestled within the pine barrens of Hampton Bays, NY, is Sweet Woodland Farm, a self-sustaining small family homestead that is 5 minutes from my home Sheridan Green.  Rachel Bristel Stephens, her husband Mike Stephens and their two children Ben and Rayna moved from a ½ acre lot to their dream house in the woods, 2 ½ years ago, with a desire to grow and raise as much of their food organically and to expand their ever growing homestead to serve the community, while living in harmony with nature.

    I met Rachel last year at the Hallockville Museum Farm seed-saving seminar that was given by Steph Gaylor, a voracious heirloom seed saving expert, farmer and owner of Invincible Summer Farms. It is no surprise that Rachel was attending this seminar as Sweet Woodland Farm grows a variety of organic heirloom vegetables, flowers and herbs from seed.

    Rachel is a natural homesteader with an inquisitive and devoted spirit to grow Sweet Woodland Farm for the health of mother earth, her family and the community at large.

    During the past two years, the Stephens family has been growing their homestead steadily. They have ducks and chickens for eggs, bees for luscious honey, guinea hens for tick maintenance, and sheep and rabbits for sheering fur into beautifully spun garments and yarns.

    Photograph by Rachel Bristel Stephens

    Photograph by Rachel Bristel Stephens

    Photograph by Rachel Bristel Stephens

    Photograph by Rachel Bristel Stephens

    sweetwoodlandfarm_15_lluciano.jpg

    Mike Stephens is a talented Woodturner and sells quality handmade wooden bowls and stunning objects; his woodwork is breathtaking. What I find most impressive is the families hatch and release program of the Northern Bobwhite quail. The Bobwhites are native to the area, but have been disappearing due to over building and loss of their nesting areas. Currently, there are 6 adults for breeding and 76 chicks being raised for release in hopes of repopulating the area and an effort to control the tick population. You can read about Great South Bay Audubon Society Adopt-A-Quail program here.

    Photograph by Rachel Bristel Stephens

    Photograph by Rachel Bristel Stephens

    On top of a large hill is the farms organic heirloom vegetables, berries, herbs and flowers. The vegetables and berries are grown in Hugelkultur beds,  a mound bed which uses organic compost mixed with manure from their farm animals. From a distance I noticed dead pine trees marked with tape. Rachel explained that the trees were killed by the root borers this past spring and they are to be taken down to make room to expand their growing space. A kickstarter campaign was recently launched to support this expansion effort. “This area would allow us to produce more than twice as much as what we are growing now, and the present growing area will become a fruit orchard,” says Rachel.

    Rachel and Michael's daughter Rayna, who is 8 years old, gave me a private tour of the gardens that sit atop this bountiful hill. She pointed out the cucumbers that will to be made into pickles and walked me through the flowerbeds where bumble bees were buzzing about among the purple majestic anise.

    sweetwoodlandfarm_10_lluciano.jpg

    Roy who is their impressive Rooster, was rambling and running the roost, causing quite a stir with his colorful calls for food finds and hen flattery.

    The guineas were gaggling and gawking about as I tried to capture their exquisite feather and painterly like face patterns.

    The sheep, Belle and Kelly, were very curious about my camera and took a break from eating hay for a portrait.

    There are plenty of classes and workshops for everyone: beginners knitting, sewing, canning, brewing and fermentation classes, raising backyard chickens, organic vegetable gardening and plenty of kid programs.

    sweetwoodlandfarm_sign.jpg

    You can find Rachel on the Suffolk Homesteading Forum' Facebook Page sharing best practices and tips with like-minded homesteaders or at Sweet Woodland Farm’s Facebook Page.

    The Stephens family and their Sweet Woodland Farm is a homestead worth supporting through their kick-starter campaign or you can visit their farm stand on Saturday and Sunday between 10 – 5 from Memorial Day through Labor.

    Address: Sweet Woodland Farm: 45 Old Squires Road, Hampton Bays, NY 11946
    Phone: 631.594.1789  Email: sweetwoodlandfarm@yahoo.com

    Sweet Woodland Farm: Duck Egg Quiche

    Photograph by Rachel Bristel Stephens

    Photograph by Rachel Bristel Stephens

    Ingredients

    • 3/4 cup all-purpose flour
    • 3/4 whole wheat flour
    • 4 oz butter, softened
    • 1 cup whole milk
    • 1 cup whipping cream
    • 4 eggs *duck eggs are the best for quiche!*
    • 1 large leek or onion, thinly sliced
    • 2 cloves garlic, minced
    • 2 cups chopped green vegetable of your choice (spinach, arugula, broccoli, summer squash)
    • 1 cup shredded cheddar cheese or swiss gruyere
    • 1/4 cup grated Parmesan, Romano, or Asiago cheese
    • salt and pepper to taste

    Directions

    1. Preheat oven to 425°.  Butter and flour a 9-inch round pie pan. 
    2. Combine flours in a bowl and work in the butter with your fingertips or a food processor till crumbly.  Add about 2 tablespoons of water and mix with hands to form a ball. 
    3. Press the dough into the pie pan with the finger tips carefully and slowly starting from the middle and working your way up the sides of the pan.  Cover pan with parchment paper and toss in a handful of dried beans or rice to hold the paper down.  Bake for 10 minutes.  Remove parchment paper and bake additional 5 minutes. Lower oven temperature to 375 degrees F.
    4. Meanwhile, sauté the garlic and leeks(or onion) in a tablespoon of butter over medium heat.  Cook till tender and a bit caramelized. 
    5. Add green vegetable and cook, covered till tender (adding a bit of water to steam if needed).
    6. Combine eggs, milk and cream in a bowl and beat till well mixed.  Season with salt and pepper to taste.
    7. Spread vegetable mixture in the bottom of the quiche crust and pour on the cream/egg.  Top with the cheeses.  Bake at 375° for 45 minutes or till set and golden.  Allow to cool to room temperature for best results.

    Sweet Woodland Farm: Beach Plum Jam

    Ingredients

    • 5 cups of pitted beach plums
    • 5 cups of organic cane sugar

    Directions

    1. Combine together in a stainless steel pot and simmer over medium heat, until it is jelled.

      note: This can take anywhere from 25 minutes to an hour. It all depends on how juicy the fruit is.
       
    2. Stirring often so it doesn't stick.
    3. To test for jelling, keep a plate in the freezer, put a spoonful of the jam on the plate, put back in the freezer for a minute. Push your finger through the jam on the plate. If it wrinkles it's ready.  
    4. Allow to cool and refrigerate or can using the water bath method.